redis 连接工具
Java 连接 Redis 的有三个
- Jedis
- SpringData Redis
- Lettuce
# Jedis
Jedis 是最直观简洁的 Redis 连接 api,但是它创建时线程不安全,我们后续会引入 Jedis 连接池来为每一个线程分配独立的 Jedis 工具类,这里先说一下使用方式。
首先要在 pom.xml 中加入 Jedis 的坐标
<!-- pom.xml -->

<dependency>
    <groupId>redis.clients</groupId>
    <artifactId>jedis</artifactId>
    <version>2.7.0</version>
</dependency>
2
3
4
5
6
7
# 初步程序演示
Jedis 的初始化参数仅需要一个 地址和一个端口号
在使用完了进行关闭就行
Jedis jedis = new Jedis("127.0.0.1", 6379);
...
jedis.close();
2
3
使用时 Redis 内的所有命令在 Jedis 都可以对应到同名的方法
比如就是 set key password
/* set name snopzyz */
String set = jedis.set("name", "snopzyz");
/* OK */
System.out.println(set);
2
3
4
这里在测试中调用一下 set 和 get
public class ...Test {

    ...

    /* 第一个运行,打印出 OK  */
    @Test
    void testSetName() {
        Jedis jedis = new Jedis("127.0.0.1", 6379);

        String set = jedis.set("name", "snopzyz");
        System.out.println(set);

        jedis.close();
    }

    /* 第二个运行,打印出 snopzyz */
    @Test
    void testGetName () {
        Jedis jedis = new Jedis("127.0.0.1", 6379);

        String name = jedis.get("name");
        System.out.println(name);

        jedis.close();
    }

    ...

}
2
3
4
5
6
7
8
9
10
11
12
13
14
15
16
17
18
19
20
21
22
23
24
25
26
27
28
29
# 对象存储
这里可以用我们之前说的,将 value 设为 string 类型的 json 字符串存储对象
要调用对象转 json 字符串的工具,导入下面坐标:
<!-- pom.xml -->
<dependency>
    <groupId>com.alibaba</groupId>
    <artifactId>fastjson</artifactId>
    <version>1.2.76</version>
</dependency>
2
3
4
5
6
做一个简单的对象 User
// com.snopzyz.entity.User.java

@Data
@AllArgsConstructor
@NoArgsConstructor
public class User {

    private Integer id;

    private String username;

    private String password;
}
2
3
4
5
6
7
8
9
10
11
12
13
然后测试流程就是:
- 初始化一个
User对象 - 存放一个 key=
user,value=(fastjson转义过的json字符串)user - 提取并用 fastjson 转义 json 字符串为 User 对象
- 输出内部内容
    @Test
    void testUser () {
        /* 初始化一个 User 对象 */
        User user = new User(1, "snopzyz", "123456");

        /* 建立 jedis 连接并存放 user-json kv字符串 */
        Jedis jedis = new Jedis("127.0.0.1", 6379);
        jedis.set("user", JSON.toJSONString(user));

        /* 获取 json 字符串,并解析到 user 内 */
        String userJsonFromJedis = jedis.get("user");
        user = JSON.parseObject(userJsonFromJedis, User.class);

        /* 打印结果,并关闭连接 */
        System.out.println(user);
        jedis.close();
    }
2
3
4
5
6
7
8
9
10
11
12
13
14
15
16
17
# 其他数据类型操作
下面是对 list 和 hash 的操作演示,并且给出了 get 后的输出结果
    @Test
    void testList () {
        Jedis jedis = new Jedis("127.0.0.1", 6379);

        jedis.lpush("list", "1", "2", "3");
        jedis.rpush("list", "a");

        /* [3, 2, 1, a] */
        System.out.println(jedis.lrange("list", 0, -1));

        jedis.close();
    }

    @Test
    void testHash () {
        Jedis jedis = new Jedis("127.0.0.1", 6379);

        jedis.hset("user", "id", "001");
        jedis.hset("user", "name", "snopzyz");
        jedis.hset("user", "password", "123456");
        Map<String, String> user = jedis.hgetAll("user");

        /* {password=123456, name=snopzyz, id=001} */
        System.out.println(user);

        jedis.close();
    }
2
3
4
5
6
7
8
9
10
11
12
13
14
15
16
17
18
19
20
21
22
23
24
25
26
27
# 连接池工具类
这里说明一下我们如何做一个静态工具类,用来从一个已经初始化好的连接池中获取 Jedis 连接。
Jedis 的连接池是 JedisPool,使用它的构造非常简单。
public JedisPool(
    /* 连接池配置类 */
    GenericObjectPoolConfig poolConfig,
    /* 主机号 */
    String host,
    /* 端口号 */
    int port
)
2
3
4
5
6
7
8
上面那个不清不楚的连接池配置类最基本的配置是配置一下“最大连接数”和“最大活跃连接数”,定义和装配用如下方式。
/* 定义一个连接池配置类 */
JedisPoolConfig jpc = new JedisPoolConfig();
/* 设置最大总连接数 */
jpc.setMaxTotal(maxTotal);
/* 设置最大活跃连接数 */
jpc.setMaxIdle(maxIdle);
2
3
4
5
6
其中有四个环境信息我们应当注意:
- 主机号
- 端口号
- 最大总连接数
- 最大活跃连接数
于是我们配好四个 properties 信息
<!-- jedis.properties -->

redis.host = 127.0.0.1
redis.port = 6379
redis.max-total = 30
redis.max-idle = 10
2
3
4
5
6
然后环境数据装为工具类 JedisUtil 的静态成员,同时做一个静态代码段来初始化我们的连接池。
最后我们用一个静态方法来获取到一个 Jedis 连接即可。
// JedisUtil.java

public class JedisUtil {

    /* Jedis 连接池 */
    private static JedisPool jp = null;

    /* 主机号 */
    private static String host = null;
    /* 端口号 */
    private static int port;
    /* 最大总连接数 */
    private static int maxTotal;
    /* 最大活跃连接数 */
    private static int maxIdle;

    /* 初始化连接池的静态代码 */
    static {
        /* 读取配置文件并装入四个成员变量中 */
        ResourceBundle rb = ResourceBundle.getBundle("jedis");
        host = rb.getString("redis.host");
        port = Integer.parseInt(rb.getString("redis.port"));
        maxTotal = Integer.parseInt(rb.getString("redis.max-total"));
        maxIdle = Integer.parseInt(rb.getString("redis.max-idle"));

        /* 初始化一个连接池配置类 */
        JedisPoolConfig jpc = new JedisPoolConfig();
        jpc.setMaxTotal(maxTotal);
        jpc.setMaxIdle(maxIdle);

        /* 初始化连接池 */
        jp = new JedisPool(jpc, host, port);
    }

    /* 获取 Jedis 连接 */
    public static Jedis getJedis () {
        return jp.getResource();
    }
}
2
3
4
5
6
7
8
9
10
11
12
13
14
15
16
17
18
19
20
21
22
23
24
25
26
27
28
29
30
31
32
33
34
35
36
37
38
39
# Spring-Data-Redis
Spring-Data-Redis 是 Spring 整合了 Lettuce 和 Jedis 的工具,需要导入坐标:
<!-- pom.xml -->

<dependency>
    <groupId>org.springframework.boot</groupId>
    <artifactId>spring-boot-starter-data-redis</artifactId>
</dependency>
2
3
4
5
6
然后为了使用这个 api ,我们在配置中写好 ip-port 以及连接池的一些信息
# application.yml

spring:
  redis:
    host: 10.211.55.16
    port: 6379
    lettuce:
      pool:
        max-active: 8
        max-idle: 8
        min-idle: 0
        max-wait: 100
2
3
4
5
6
7
8
9
10
11
12
api 为 Redis 的操作提供了一个 RedisTemplate
从它可以调取几个针对数据类型的操作:
(ValueOperation) redisTemplate.opsForValue():操作 string(SetOperation) redisTemplate.opsForSet():操作 set(HashOperations) redisTemplate.opsForHash():操作 hash(ListOperations) redisTemplate.opsForList():操作 list(ZSetOperations) redisTemplate.opsForZSet():操作 sorted_set(GeoOperations) redisTemplate.opsForGeo():操作 GEO(HyperLogLogOperations) redisTemplate.opsForHyperLogLog():操作 hyper_log_log
具体的使用就从最基础的 string 操作演示,从 test 内运行。
// SpringDataRedisApplicationTests.java

@SpringBootTest
class SpringDataRedisApplicationTests {

    @Autowired
    private RedisTemplate redisTemplate;

    @Test
    void sample () {
        /* set name snopzyz */
        redisTemplate.opsForValue().set("name", "snopzyz");
        /* get name */
        String name = (String) redisTemplate.opsForValue().get("name");
        System.out.println("name = " + name);
    }
}

/**
 * OUTPUT:
 *
 * name = snopzyz
 */
2
3
4
5
6
7
8
9
10
11
12
13
14
15
16
17
18
19
20
21
22
23
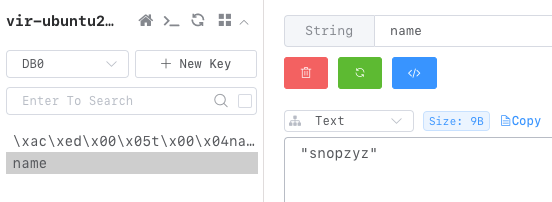
然后我们去看一下库里面

发现这并不只是我们的 name-snopzyz 啊,前面加了别的东西,这是因为这个 api 默认的序列化工具的机制,我们不想用这套,可以自定义一下序列化方式。
自定义序列化
我们要将 key 用 string 序列化,value 用 json 序列化(方便我们后面存储对象),
由于 RedisTemplate 类中存在 setKeySerializer() 这样的方法,于是可以直接在已有的基础上做 RedisTemplate 的 Bean。
Bean 创建步骤:
- 创建 RedisTemplate 对象
- 设置连接工厂
- 创建 Json 序列化工具
- 设置 Key 和 HashKey 的 string 序列化
- 设置 Value 和 HashValue 的 json 序列化
先导入 json 序列化工具坐标
<!-- pom.xml -->

<dependency>
    <groupId>com.fasterxml.jackson.core</groupId>
    <artifactId>jackson-databind</artifactId>
</dependency>
2
3
4
5
6
然后将这个 Bean 装到 RedisConfig 类中
// config.RedisConfig.java

@Configuration
public class RedisConfig {

    @Bean
    public RedisTemplate<String, Object> redisTemplate(RedisConnectionFactory connectionFactory){
        // 创建RedisTemplate对象
        RedisTemplate<String, Object> template = new RedisTemplate<>();
        // 设置连接工厂
        template.setConnectionFactory(connectionFactory);
        // 创建JSON序列化工具
        GenericJackson2JsonRedisSerializer jsonRedisSerializer = new GenericJackson2JsonRedisSerializer();
        // 设置Key的序列化
        template.setKeySerializer(RedisSerializer.string());
        template.setHashKeySerializer(RedisSerializer.string());
        // 设置Value的序列化
        template.setValueSerializer(jsonRedisSerializer);
        template.setHashValueSerializer(jsonRedisSerializer);
        // 返回
        return template;
    }
}
2
3
4
5
6
7
8
9
10
11
12
13
14
15
16
17
18
19
20
21
22
23
然后我们不用变上面测试类中的信息,运行一下看看库。

成功多出来了一个 name-snopzyz 对(value是 "snopzyz" 是因为我们配置的 json ,这里里面又封装了一份双引号)
# 对象存储
就像我们上面配置序列化的时候,ValueOperation 除了对 string-string 的添加之外,还可以做对象的存储。
先做一个对象
// entity.User.java

@Data
@NoArgsConstructor
@AllArgsConstructor
public class User {
    private String name;
    private Integer age;
}
2
3
4
5
6
7
8
9
然后用这个类做实例放到 value 内,按上面相同的方式构建出下面代码。
// SpringDataRedisApplicationTests.java

...

    @Test
    void ObjectSetGetTest () {

        redisTemplate.opsForValue().set("user:001", new User("snopzyz", 21));
        User user = (User) redisTemplate.opsForValue().get("user:001");
        System.out.println("user = " + user);
    }

...

/**
 * OUTPUT:
 *
 * user = User(name=snopzyz, age=21)
 */
2
3
4
5
6
7
8
9
10
11
12
13
14
15
16
17
18
19
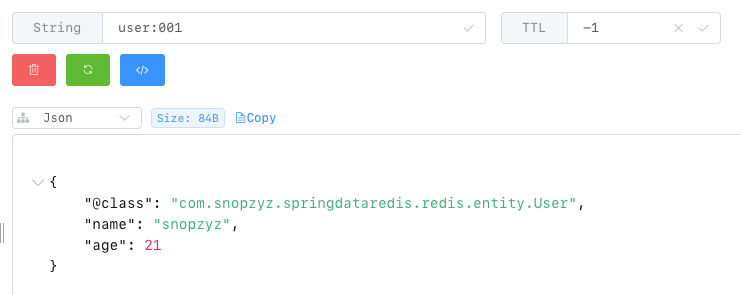
库中会保存这样一条 kv 数据:

这已经是我们想要的数据了,但是有一个 @class 字段帮助我们自动识别类完成反序列化,它太长了太占用内存,不想要它的话需要做手动正反序列化。
先导入 fastjson 坐标来调用工具使 object 转为 json
<!-- pom.xml -->

<dependency>
    <groupId>com.alibaba</groupId>
    <artifactId>fastjson</artifactId>
    <version>1.2.76</version>
</dependency>
2
3
4
5
6
7
而用 redistemplate 类的时候就使用纯 string-string 的类即可,这个在 spring-data-redis 也已经做好了直接使用的实现类 StringRedisTemplate
// SpringDataRedisApplicationTests.java

@SpringBootTest
class SpringDataRedisApplicationTests {

    @Autowired
    private StringRedisTemplate stringRedisTemplate;

    @Test
    public void stringRedisTemplateTest () throws JsonProcessingException {
        /* 做一个 user 实例并序列化为 userJson
           以 user:001 为 key 存入 value 中   */
        User user = new User("snopzyz", 21);
        String userJson = JSON.toJSONString(user);
        stringRedisTemplate.opsForValue().set("user:001", userJson);

        /* 取出 json 字符串并反序列化为 user 实例 */
        String value = stringRedisTemplate.opsForValue().get("user:001");
        User user1 = JSON.parseObject(value, User.class);
        System.out.println("user = " + user1);
    }
}

/**
 * OUTPUT:
 *
 * user = User(name=snopzyz, age=21)
 */
2
3
4
5
6
7
8
9
10
11
12
13
14
15
16
17
18
19
20
21
22
23
24
25
26
27
28
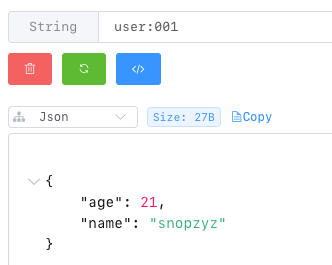
打开库看一眼

也确实简洁版的 json 信息也已经出现在库中了
# 其他数据类型操作
这里以 hash 操作再做个示例
// SpringDataRedisApplicationTests.java

...

    @Test
    public void hashTest () {
        /* hset name:002 name snopzyz */
        stringRedisTemplate.opsForHash().put("user:002", "name", "snopzyz");
        /* hset name:002 age 21 */
        stringRedisTemplate.opsForHash().put("user:002", "age", "21");

        /* get name:002 */
        Map<Object, Object> entries = stringRedisTemplate.opsForHash().entries("user:002");
        /* 将获取到的信息全部打印出来 */
        for (Map.Entry<Object, Object> entry : entries.entrySet()) {
            System.out.println(entry.getKey() + " : " + entry.getValue());
        }
    }

...

/**
 * OUTPUT:
 *
 * name : snopzyz
 * age : 21
 */
2
3
4
5
6
7
8
9
10
11
12
13
14
15
16
17
18
19
20
21
22
23
24
25
26
27
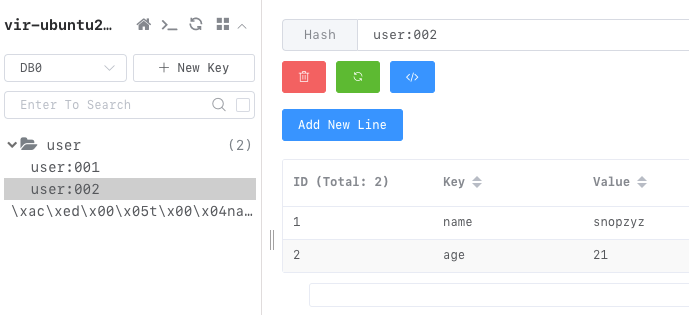
这里已经成功打印,看一下库

这里数据也已经有了
