第一个 SpringMVC 项目
Chivas-Regal
# 过程详解
- 新建 maven 项目
- 按上面创建 web 工程的方式加入 WEB-INF 以及 tomcat8(tomcat10不能用javax,所以先不使用)
- 在 pom.xml 中导入如下配置
<dependencies>
    <dependency>
        <groupId>javax.servlet</groupId>
        <artifactId>javax.servlet-api</artifactId>
        <version>3.1.0</version>
        <scope>provided</scope>
    </dependency>
    <dependency>
        <groupId>org.springframework</groupId>
        <artifactId>spring-webmvc</artifactId>
        <version>5.2.10.RELEASE</version>
    </dependency>
</dependencies>

<build>
    <plugins>
        <plugin>
            <groupId>org.apache.tomcat.maven</groupId>
            <artifactId>tomcat7-maven-plugin</artifactId>
            <version>2.1</version>
            <configuration>
                <port>8081</port> <!--看tomcat监听的是什么内容-->
                <path>/</path>
            </configuration>
        </plugin>
    </plugins>
</build>
1
2
3
4
5
6
7
8
9
10
11
12
13
14
15
16
17
18
19
20
21
22
23
24
25
26
27
2
3
4
5
6
7
8
9
10
11
12
13
14
15
16
17
18
19
20
21
22
23
24
25
26
27
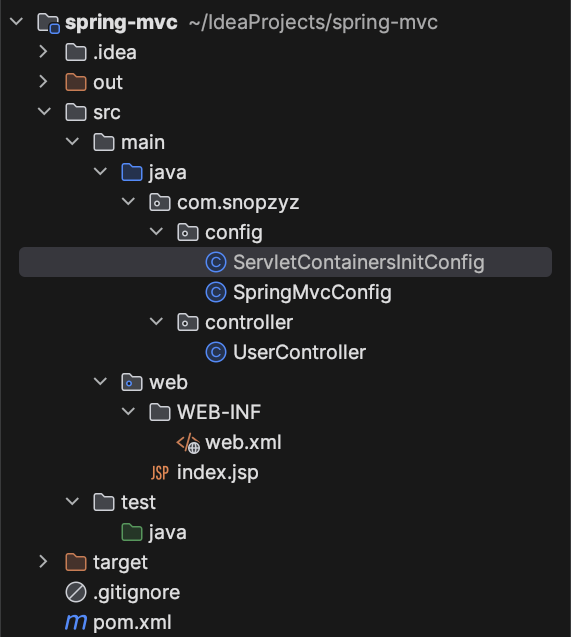
这是我们的项目结构

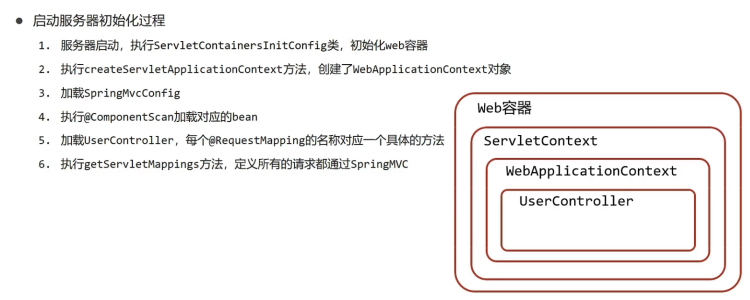
SpringMvcConfig 主要做的是和我们之前配置 Spring 配置类做的事情一样
// SpringMvcConfig.java

@Configuration
@ComponentScan("com.snopzyz.controller")
public class SpringMvcConfig {
}
1
2
3
4
5
6
2
3
4
5
6
ServletContainersInitConfig 主要做的是和 Tomcat 进行连接,然后
- 将配置文件指向 SpringMvcConfig
- 给出工程在 web 上访问的根路径,拦截这个路径下的所有请求由 SpringMvc 的 Bean 来管理
// ServletContainersInitConfig.java

/* 继承 AbstractDispatcherServletInitializer 来完成 Tomcat 的沟通
   如果还有别的类继承了则会报错无法启动 */
public class ServletContainersInitConfig extends AbstractDispatcherServletInitializer {
    /* 将配置文件指向 SpringMvcConfig */
    @Override
    public WebApplicationContext createServletApplicationContext() {
        AnnotationConfigWebApplicationContext ctx = new AnnotationConfigWebApplicationContext();
        ctx.register(SpringMvcConfig.class);
        return ctx;
    }
	/* 根路径就是web总工程的根路径 */
    @Override
    public String[] getServletMappings() {
        return new String[]{"/"};
    }

    @Override
    public WebApplicationContext createRootApplicationContext() {
        return null;
    }
}
1
2
3
4
5
6
7
8
9
10
11
12
13
14
15
16
17
18
19
20
21
22
23
2
3
4
5
6
7
8
9
10
11
12
13
14
15
16
17
18
19
20
21
22
23
UserController 则是我们设计的表现层类,用作接受数据并返回数据
// UserController.java

@Controller
public class UserController {
	/* 发送数据发送给 save,比如从浏览器打开 /localhost:<端口号>/<工程名>/save
 	   这里会返回字符串 */
    @RequestMapping("/save")
    @ResponseBody
    public String save () {
        System.out.println("user save ...");
        return "{'info' : 'chivas-regal'}";
    }
}
1
2
3
4
5
6
7
8
9
10
11
12
13
2
3
4
5
6
7
8
9
10
11
12
13

这样运行之后给路径下加个 /save 就会获取到这样的数据

并且在编辑器那边也会有输出

# 问题说明
# 问题1:tomcat10.X
tomcat10 对这套无法使用,因为 tomcat10 交给 eclipse 管理,不能使用 javax 而是换了套名字 jaka...
# 问题2:进入 .../save 后报404
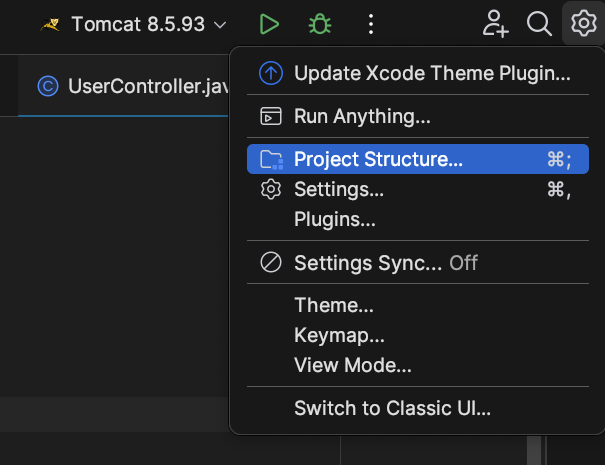
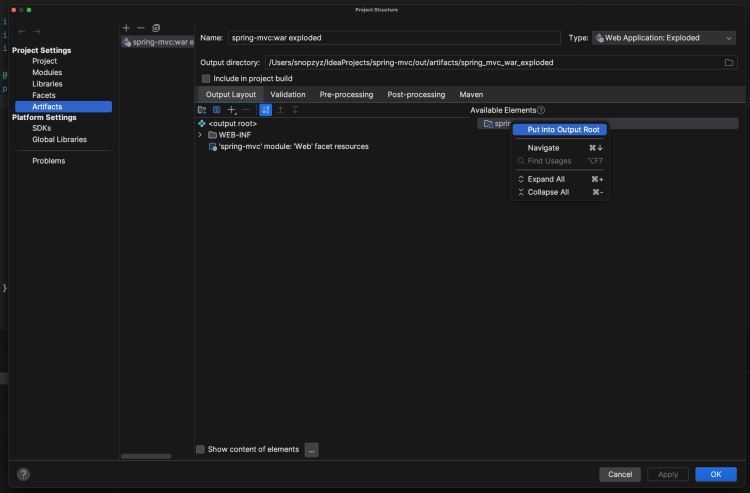
大概率是因为没有将本工程后端内容加入输出导致的,进入 Project Structure

选中左侧的 Artifacts,然后选择对应的工程 Artifact,右击要加入输出的 Element(在右侧),然后选择 Pull Into Output Root ,再 Apply 即可

