SpringBoot 依赖探究
Chivas-Regal
# 依赖项溯源
在工程 pom.xml 文件中,存在父工程的 pom.xml
<!-- springboot_demo/pom.xml -->

...
<parent>
    <groupId>org.springframework.boot</groupId>
    <artifactId>spring-boot-starter-parent</artifactId>
    <version>2.7.16</version>
</parent>
...
1
2
3
4
5
6
7
8
9
2
3
4
5
6
7
8
9
这个父工程也有它的父工程
<!-- spring-boot-starter-parent-2.7.16/pom.xml -->

...
<parent>
    <groupId>org.springframework.boot</groupId>
    <artifactId>spring-boot-dependencies</artifactId>
    <version>2.7.16</version>
</parent>
...
1
2
3
4
5
6
7
8
9
2
3
4
5
6
7
8
9
在 spring-boot-dependencies 中存在一系列的变量与依赖管理
<!-- spring-boot-dependencies-2.7.16/pom.xml -->

...
<!--变量,主要是一些版本号-->
<properties>
...
    <junit.version>4.13.2</junit.version>
...
</properties>
<!-- 依赖管理,主要是一些利用上面变量作为版本号的依赖 -->
<dependencyManagement>
...
    <dependency>
        <groupId>junit</groupId>
        <artifactId>junit</artifactId>
        <version>${junit.version}</version>
    </dependency>
...
</dependencyManagement>
<build...>
...
1
2
3
4
5
6
7
8
9
10
11
12
13
14
15
16
17
18
19
20
21
2
3
4
5
6
7
8
9
10
11
12
13
14
15
16
17
18
19
20
21
有了这些,我们在自己的工程的 <dependencies> 中只需要加上所需的依赖不需要加版本即可
然后是我们工程 pom 中的两个依赖
<!-- springboot_demo/pom.xml -->
...
<dependency>
    <groupId>org.springframework.boot</groupId>
    <artifactId>spring-boot-starter-web</artifactId>
</dependency>

<dependency>
    <groupId>org.springframework.boot</groupId>
    <artifactId>spring-boot-starter-test</artifactId>
    <scope>test</scope>
</dependency>
...
1
2
3
4
5
6
7
8
9
10
11
12
13
2
3
4
5
6
7
8
9
10
11
12
13
其中第二个依赖就是一些 spring-test 依赖
第一个依赖中存在 spring-web、spring-webmvc、spring-boot-starter-tomcat
这三个帮助我们开发 web 程序,并且内置了一个 tomcat 服务器便于我们启动
而在 SpringbootDemoApplication 中
// SpringbootDemoApplication.java

@SpringBootApplication
public class SpringbootDemoApplication {

    public static void main(String[] args) {
        SpringApplication.run(SpringbootDemoApplication.class, args);
    }

}
1
2
3
4
5
6
7
8
9
10
2
3
4
5
6
7
8
9
10
SpringApplication的启动会根据 pom.xml 中的配置来启动程序
比如我存在 web ,那启动会作为一个 web 服务器启动
# 依赖项变更-tomcat切换jetty
由于 springboot 的祖先级 pom 都是官方配好的只读的,我们不能利用可选依赖,使用排除依赖
找到 pom.xml 中 web 那一块
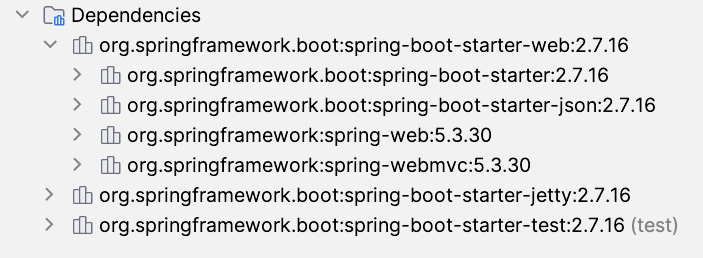
将其 tomcat 排除掉,然后在下面再添加一个 jetty 的依赖
<!-- springboot_demo/pom.xml -->

...
<dependency>
    <groupId>org.springframework.boot</groupId>
    <artifactId>spring-boot-starter-web</artifactId>
    <!-- 排除项 -->
    <exclusions>
        <exclusion>
            <!-- 排除 tomcat 依赖 -->
            <groupId>org.springframework.boot</groupId>
            <artifactId>spring-boot-starter-tomcat</artifactId>
        </exclusion>
    </exclusions>
</dependency>
<!-- 加入 jetty -->
<dependency>
    <groupId>org.springframework.boot</groupId>
    <artifactId>spring-boot-starter-jetty</artifactId>
</dependency>
...
1
2
3
4
5
6
7
8
9
10
11
12
13
14
15
16
17
18
19
20
21
2
3
4
5
6
7
8
9
10
11
12
13
14
15
16
17
18
19
20
21
maven 刷新一下,少了 tomcat 多了 jetty

运行起来就可以发现是用的 jetty

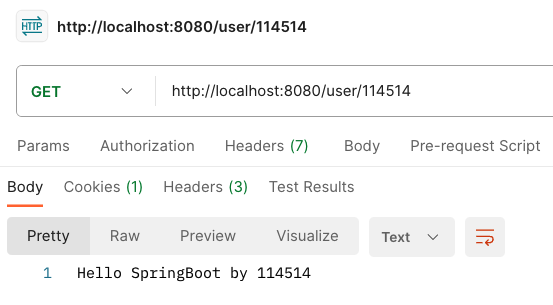
postman 也正常交互了

